Monday, November 19, 2012

Decor Amour: Part 2

read part 1 here

...When you walk through our living room there's a nice large entry way to our kitchen.


I am still working on a few things I want to do in here (in other words, I am waiting for some Hobby Lobby gift cards in my stocking and hopefully Santa brings two rugs).


I made the table runner from some Hobby Lobby fabric and wonderful Heat Bond tape for the hemming (because I sure can't sew). I just spray-painted the silver chargers I already had a nice bronze color, bought the napkins and little topiary tree things at Target and found the cute succulent napkin rings at ZGallerie. 
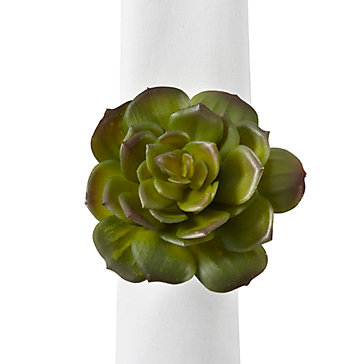
close-up of the napkin rings from ZGallerie
better view of the napkins (this is actually the table runner in the same fabric)


My favorite part of my kitchen - besides finally having a dishwasher and pantry are the things i have hanging on either side of the front window.


That big smudgey thing on the top left is a mirror that needs cleaning bad, the two picture frames are old ones that I just spray-painted to match the new color scheme (green, red & yellow), I found the "Roll With It" print at Over the Big Moon and just made some color changes, the key came from Hobby Lobby and I made the chevron/Joshua 24:15 printable. That big red sun was once my Mema Kay's, I had it in the back bedroom in the old house and I am so glad I got to paint it and put it somewhere more visible now!


For the right side of the wall, I used a metal flower sign from Hobby Lobby, spray painted an old frame red, covered a wooden "E" in the same fabric as my table runner and used an existing frame for the picture of Sookie. That big red fork (which came the Hob Lob)? It totally fell off the wall and every one of his tines broke off, praise God for hot glue guns. I think it needs a wooden spoon to go underneath, thoughts?


Between the two walkways (one that leads to the play room and the other that leads to the living room) I have my old china cabinet. I spray painted (are you sensing a theme here?) one of my tall flower tub things bronze and got some flowers from the Hobby Lobby, along with some candles and a little owl figurine (which I also spray painted). The big "E" picture was a wedding gift from Josh's step-grandma and didn't really match much in the old house, so I was happy to finally have a place to hang it. 


and finally - a PANTRY!

We also have a nice desk area and laundry room right beside the pantry but woof, it needs some work. Right now it is still storing some unpacked boxes and a bunch of mess, I need a weekend to dedicate to that area.


Friday, November 16, 2012

Decor Amour: Part 1.

When I discovered we had to move for husband's job, the feature that excited me most wasn't the bigger size of house we would be getting, or being closer to work (and more importantly, Bojangles), instead I was most excited about getting to decorate a new house!

Thanks to Hobby Lobby, TJ Maxx, HomeGoods and spray paint. I re-decorated on a budget and I love the results.

Here are a few shots of the entry way at the new place...

as you can kinda see, my little silver tray on the table has become the drop-off point  for keys, wallets and etc.

by spray-painting old frames, printing out that little "Edmondson" sign and modge-podging it onto an old piece of wood and printing out some printables I made, this was a pretty cheap little entry way. Also, you can see my DIY Initial Art post here.

Directly to the left of the entry way is the living room and a little wall between the living room and play room, where I put some of our wedding pictures.

Then we move on to the living room..


The only new things in the living room are the chairs and couch (Hardees Furniture), green lamps (Target) and silhouette art (DIY project). I spray-painted existing picture frames, then brought the shelf from over our fire place in the old house to put over our new couch, and used our end tables and other furniture from the old house.

Then... there's the other corner of the living room.... that I definitely haven't unpacked. But I have a good reason: we plan on putting the Christmas tree there. And lord knows I don't want to unpack all the books that are filling those gray totes then have to pack them right back up.

Monday, I'll share my favorite room.. the kitchen!

Thursday, November 15, 2012

Saw it, Pinned it, Did it #3


I am linking up again with Katie @ Keep Calm & Carry On and Steph @ Beautiful Mess again for "Saw it, Pinned it, Did it"!


My new memo board!

I saw a great Memo Board made from fabric, scrapbook paper and a picture frame at Red Heads Craft More Fun (how fitting right?) and I just had to make it for the empty wall in our laundry room area, right by the door to the garage.


(I didn't include the scrapbook paper and such because I did things a little differently). 


1. Find your old framed picture or poster (or buy a new one) and take out the existing inside cardboard piece or poster if it's hard (that's what she said). 

love this poster, but doesn't really match the new decor.

2. Now, this step can vary. If you want, you just cut a piece of scrapbook paper, but I used fabric, so I wrap the existing poster in the fabric (leftover from my monogram art project) and secured it with packing tape. 


Make sure the fabric is pulled really tight, to prevent bubbles and ripples.


3.  Either use scrapbook paper and letter stickers or print out cute little things that you may want on your memo board OR just use the Memo Board like a plain dry-erase board and leave it blank to write anything on. 
sheets I made (with the amazing Adobe Creative Suite) for my board

4. Secure the scrapbook paper or whatever you used on your fabric then put back into frame.

This is totally photoshopped - forgot to take a picture of it not hanging with the things on it.

5. Hang your new memo board and enjoy! Also, don't be like me and forget to buy dry erase markers....

And here's how it would look without the printables...

Go link-up, and check out all the other crafty ladies!