Showing posts with label DIY. Show all posts

Monday, September 15, 2014

so many wins.

This weekend was full of winning moments. Not only did my ECU Pirates beat Virginia Tech, but I also had 2 baby showers and finished up my last craft for the nursery!

Bright and early Saturday morning (aka at 7am when Sawyer decided to get up), I finally got to work on re-covering Sawyer's old pirate bumper using this tutorial. I have been putting off making the bumpers because I was so scared to actually cut huge hunks from the fabric I ordered, I bet I measured each strip 10 times! No pics of the finished product yet because I ran out of the stupid ribbon I was using for the ties, so come back tomorrow for a full nursery & name reveal.


Saturday afternoon we went to Raleigh for a shower with our tailgate crew. Saturday also happened to be the ECU vs. Virginia Tech game, so even though the shower was supposed to start at 2pm, we ended up not opening gifts until 4:30-ish because we were so busy watching the game!

too busy watching the game for shower business

I did get some great gifts from our friends though and it was wonderful getting to watch such a high-stress game together. We managed to not get any pictures because we were so caught up with the Pirate win!

Sunday we had another shower, this one was at my church hosted by two of my best friends, Dana & Hope and Dana's mom, Mrs. Teresa. While we were calling the shower a "sprinkle" since we don't expect much with this being our second baby and the same gender as our first, our church family, family & friends were too sweet and loaded us with gifts! I spent several hours in the nursery last night putting away diapers, wipes, outfits & bottles! Forgive the quality of the pictures below, they were stolen from Facebook or taken with my horrible phone camera (note to self: stop forgetting your actual camera!)


my MIL, Vivian (with my niece Karlie), Hope, Mrs. Teresa, Me, Dana & my mama


Hope feeling me up putting on my corsage
so much food
the whole driver-side backseat was filled, even with the seat folded down! #blessed
seriously.
Now that we've got the nursery basically done and all the stuff we could possibly need (save for a few things I need to pick up thanks to some awesome Target gift cards) we are ready for baby. Well ready, but not wanting him to come out for at least 7 weeks!


Friday, September 5, 2014

DIY Covered Lamp Shade

Since I decided to recover a lot of Sawyer's nursery stuff for baby number 2 (after not being able to find a bedding set I liked), I knew I was going to need to re-cover a lampshade and paint a lamp base that I already had to match the recovered bumper (which I still need to make...) and the curtains.  I had an old iron-base lamp that I'd already painted pink once with a plain white lamp shade in the old guest bedroom so I knew it would be the perfect one to re-do. After spray-painting the base red, I got ready to recover the shade using this tutorial.

  • lamp shade
  • craft paper (or any large piece of thick paper)
  • scissors
  • pen
  • fabric
  • hot glue
  • ribbon
  • pins


1. Lay out your craft paper and place your lamp on top of it with the seam of the shade down. 

2. Roll the lamp shade around the paper, tracing the bottom as you go, until the seam is down again. Then roll it back, tracing the top to create a template. 


3. Cut our your template. I held mine up against my lamp to be sure it was actually covering the lamp where needed. 

4. Lay our template on your fabric, pinning it it place (or taping) to be sure it doesn't slip and slide all over the place. Add about an inch to the top, bottom & one side to give you some room to work with when you actually glue it to the shade. I forgot to take a picture of this, so see below photo from "Momtastic: DIY". 


5. Apply a line of hot glue around the top of your shade and roll the fabric onto the shade leaving the extra inch hanging above and below the bottom, making sure to smooth out any wrinkles. Once in place, add a line of hot glue around the bottom and secure the fabric. Don't worry about how your fabric looks where it meets, we'll address that later!

6. This part got a little a little tricky. As you can probably see in the second photo, my shade had little support beam things in the top that went down to the part where the light bulbs screws in to hold the shade to the base. I cut little notches in the extra fabric at the top so it would fold down around the little beams. Then I put little lines of hot glue on the inside of the shade between the beams and pulled the fabric over the edge and down onto the glue. The bottom part was much easier, I just applied hot glue to the inside of the bottom of the shade then pulled the fabric around to the glue. I once again didn't get a photo of this (mainly because I was nursing several glue gun burns), so see below photo from "Momtastic: DIY", they used clothespins to hold their fabric in place, I didn't have to since my hot glue cools pretty quickly and therefore the fabric stayed in place by itself. 


7.  Because I was using my little transportation fabric with different roads, cars & signs and such, it was pretty easy to see the ugly seam where my fabric ends met. To hide that, I hot glued a strip of coordinating grosgrain ribbon over the seam then placed two more (equally spaced) pieces of ribbon around the shade. I added it to my painted base and TA-DA, new lamp for the nursery.


Check out my other DIY stuff for the nursery such as the curtains and the felt mobile!

Tuesday, August 19, 2014

DIY Curtain Additions

When it came to a nursery for Baby Edmo 2, I looked and looked for a bedding set and just couldn't settle on one that I liked that met our budget. I finally decided to just re-cover Sawyer's old bumper, and then make my own bed skirt, curtains, and etc.

This was easier said than done, especially when it came to curtains.

With saving money in mind, I found fabrics I liked but then realized that for four panels of curtains that would fit the floor to ceiling windows in the nursery, I would need fabric that measured over 14 x 18 feet... and the fabric I liked was almost $10/yard. so that wasn't happening. And I wanted to make them blackout curtains since the windows face the front of the house which is where the sun rises and there's a giant street light. With all that, I decided to just purchase some blackout panels that coordinated with my fabric and then add my fabric to the curtains almost like an attached valance, to make them match the rest of the nursery.

purchased blackout curtains

fabric to add (Jill McDonald - On Track Metropolis)


1. Layout your curtains and iron them out so that they are completely straight (helps in measuring accuracy for your fabric). Now layout your fabric over the curtain, ironing it as well so that it lays flat over the curtain in the area where you want the fabric to cover. 

2. Cut your fabric to the desired length/width, leaving enough hangover on the edges that is can be wrapped around to the back, about an inch or so. 

3. Using the Heat 'n Bond tape, iron a strip close to the edge of your fabric for the full length of the fabric at the top and bottom. For my brand of Heat 'n Bond, I had to apply heat for 2 seconds. 


4. Once your strip has cooled, remove the paper backing and place your fabric where you want it on the curtain. Then iron over the fabric, bonding it to the curtain. My brand of Heat 'n Bond required 6 seconds of heat application. Remember to leave about an inch of fabric over the edge to be wrapped later


You'll note that the fabric has a rough edge to the fabric, don't worry we're going to cover that mess with some ribbon!

5. Measure your ribbon that will cover the rough edges to once again be the length of the curtain with about an inch extra on each end. Apply a strip of Heat 'n Bond to the ribbon then iron, allow to cool and peel away paper. Iron the ribbon onto the curtain so that it covers the rough edge of the fabric, leaving that inch of extra on each end.


6.  Now that you have your fabric and ribbon adhered to the curtain, flip the curtain over and create a seam where you want the excess fabric & ribbon that you left on each end to wrap around the back of the curtain. Once you have your seam, unfold the edge and apply a strip of Heat 'n Bond to back of the ribbon and fabric. Once again, allow to cool then peel away the paper. Now you can iron the edges down to the back of your curtain. 

7. Hang them jokers up and admire your handy work (or iron them first so they look better than mine do in the picture). 


I used the same fabric to make a bedskirt following this tutorial. 

Monday, August 11, 2014

DIY Felt Mobile

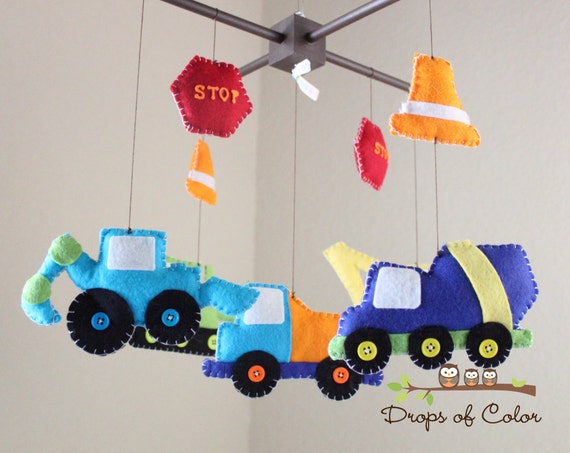
Since I am recovering Sawyer's old crib bumper and making curtains and a skirt for Baby Edmo No. 2 to use in his nursery, I realized I also needed to get a new mobile to match the transportation theme and to match the fabrics I chose for the bedding.


I looked and looked for a cute car mobile that included a school bus, airplane, and other little traffic-related things but I just could not find one I liked within my budget. Then I discovered this precious felt mobile on Etsy (at Drops of Color Shop):


My first thought was, "do people actually spend $95 on crib mobiles?!" And my second thought was, "Hey, I could totally make one of those."

So I hit up Pinterest and searched for "DIY Felt Mobile" until I found a great tutorial by Jess at Craftiness is Not Optional! I went about my mobile-making a little differently, but stuck to her ideas on how to make it happen.


  • Felt (the big sturdy sheets work better than the flimsy smaller ones)
  • Hot glue gun
  • Templates (aka Google-d images of what you want, printed on cardstock)
  • Needle & Embroidery Thread (embroidery thread is heavier and holds the felt together better)
  • An old mobile (or you can follow Jess' directions for how to make one)
  • Cotton Balls


  1. Determine how large you want your mobile pieces to be and print out "templates" of what you want them to look like. I made mine about 4 inches long by 2 inches wide and printed them on heavy cardstock for better trace-ability. Cut out each individual car or shape. 

  2. Using a straight pin or your sewing needle pin your shape to the felt and trace around the edge. Move the shape to another area of your felt and trace again. Now cut out your two traced shapes, making sure they line up equally when placed on top of each other. 

  3. With your needle & thread (obviously), sew the two identical shapes together around the edges. Now, I am the world's worst sewer. My stitches are unequal and I got my dumb needle tangled a million times, but I think that it makes my shapes quirky and gives them a homemade charm. DO NOT sew all the way around your shape, leave a good little inch gap where you can add your "stuffing" later. 


  4. Once you've sewn almost the whole way around with a nice little inch gap for stuffing, pull a cotton ball apart a little to make it less ball-shaped. Once you have fluffed up your stuffing, start putting the cotton inside your shape. I used about 4 cotton balls for each shape. 


  5. Finish sewing your shape "shut". 

  6. Now that you have your shape, you can add little details. I chose to hot glue the windows, wheels and etc. on my little cars but you could also sew them if you'd like. Make sure you cut out accent pieces for both sides of your mobile shape since mobiles turn!
    pieces before accents
    pieces with (a few) of the accents added
  7. I used Sawyer's old mobile frame for this mobile so I just needed to get my little shapes onto ribbon so they could hang from the mobile. I measured my ribbon then sewed it about an inch from the bottom to the center of my shape.

  8. After I made sure the shape hung right from the ribbon, I hotglued the bottom part of the ribbon beneath the stitch to the part of the ribbon above the stitch.

  9. Then I just looped the ribbon through the spots on my mobile and hotglued the ribbon together to stay! I added little accents like the traffic cones & stop signs to cover the edges of the glued ribbon at the top and the little stoplight to the center. 
Sawyer has re-discovered his love for his baby mobile and wants to "listen" to it play constantly, hence the only picture of the completed project having him in it. 
close-up of the firetruck

and close-up of the  plane
I might eventually go back and add headlights and taillights to the fire truck and school bus, and maybe get some little alphabet stickers to spell "STOP" on the stop signs, too. 


Wednesday, July 30, 2014

extra pieces

As you may have already read in this post, our spare bedroom is going to become a nursery in November so we have slowly been figuring out what to do with all the things we store in there and extra pieces of furniture with no home. And when I saw 'we" I mean "me" since all of my folded-in-the-dresser clothes were housed in the spare room in my dresser from my college apartment (and most of my hangup stuff was in that closet). 

the messy spare bedroom before all the moving around
To begin the clearing, I sold my beautiful Lilly Pulitzer comforter, recovered the upholstered headboard with a maroon sheet to use in Sawyer's room, promised my sister my white desk, and took down all my girly pink & green decor. 

Then I had to figure out what to do with my clothes. Knowing that I couldn't sacrifice an entire dresser full of storage for clothes, I convinced my lovely husband to paint the spare room's dresser & nightstand (since my little sister is about to move into a house with friends in Wilmington and could use our old nightstand) to match our current bedroom furniture and then just move both pieces into our room. 

the master bedroom
The dresser got tucked into the corner behind our door where we had a wicker love seat, that served as a storage spot for Josh's discarded clothes usually (the below picture is from when we first moved in, hence the over-the-toilet shelf sitting on the floor). 


I re-painted the pink and green knobs that were already on the furniture and just moved some pictures I already had on my nightstand and in the bathroom, painted a glass container to match the knobs and hung up a bird picture that had just been sitting in my closet needing a home. 


Sadly, as an idiot college student I threw out the handles that went with this dresser convinced I could find some cuter ones to fit. I was wrong. The holes on the dresser are a weird distance apart so in order to buy some handles to fit the drawers I would need to putty the existing holes and then have Josh drill new ones. That isn't going to happen (aka aint nobody got time fo' dat). So for now, there is grosgrain ribbon in the holes serving as handles. And yes, those are the throw pillow and shams stacked beside the dresser, because making the bed is hard.


You see that big strip of black fabric behind the nightstand? That's a blackout curtain that is literally thumb-tacked to the window casing. We already had the curtains from the hold house and I really need to recover them to match our bedroom (not to mention hang them) but for now, they are keeping the room sun-light free in the mornings and that's all we need. 

I am so pleased with how the dresser and nightstand came out (and extra pleased that I wasn't the one who had to paint them). Now we have more or less cleared out the spare room, the fun crafty things for the nursery begin!

Wednesday, July 2, 2014

Princess Ella turns One!

This past weekend (as in Sunday, yes I am just now blogging on Wednesday), my best friend Hope's little girl, Ella Marie turned one! I feel like we were just celebrating Ella's impending arrival at Hope's baby shower, so I could hardly believe when Hope texted me a few months ago and said "let's start planning Ella's party".

Hope had already chosen a precious chalkboard-print style invitation with pink and mint colors and a cupcake/princess theme, which naturally meant we needed to add some gold glitter in the mix too. After a few Saturday's of making fake cupcakes (tutorial here) for the tables, spray-painting some mason jars & making a three-tier cupcake server (tutorial here) - I am super pumped with how well everything turned out and Ella seemed to have a great time being celebrated!


Hope's sister-in-law Elizabeth made some fun memory boards with pictures that looked great on the mantle in the clubhouse!
Hope's super crafty mom, Mrs. Nell made Ella's tutu and a precious tutu and cover for the high chair too.


we were totally worried that the big heavy cupcake on top was going to just topple over on the home-made cake tier tray but it worked out great (as long as there were cupcakes on the bottom two tiers to keep it steady)
three-tiered tray minus the cupcakes
the fake cupcakes were a great addition to the food table and centerpieces and went great with the theme, and yes we did have to remind a few people that they were indeed fake. 

Princess Ella getting into her smash cupcake (and surrounded by paparazzi)


My favorite picture, Hope, Ella & Eric (post-cupcake eating) 

papa, paparazzi
opening her numerous gifts

tantrums are cuter in tutus, and it's her party and she can throw a little tantrum if she wants to.
...besides, she bounced right back.

Rachel, Dana & Colton enjoying the festivities
Scarlet and Colton ready to make a run for it

Ella and her sweet grandpas
I am so happy that I got to be a part of not only the party-planning for Ella, but also her first year. Can't wait to celebrate many more birthdays with this princess. 

You may notice that there are no pics of Sawyer from this party. Homeboy spent an entire week at the beach with Josh's family (and Josh went down Wednesday) and was too ill from traveling and helping unpack his grandparents' cars to grace us with his presence (as was his daddy). So Saturday while I was spray-gluing sprinkles to the top of fake cupcakes Sawyer was thankfully not around to destroy them, instead he was fishing with his "uncle jordy".