Showing posts with label Recipes. Show all posts

Thursday, February 27, 2014

new favorite recipe

I've been trying to do better about eating lunch in my office versus getting out in Greenville traffic at lunch time and spending money. In order to this, I have to cook things I actually want to eat at lunch. I've toyed with some salads (like actual lettuce & topping salads - see those recipes here) and just bringing leftovers from dinner, but two weeks ago I found a recipe for an Avocado Chicken Salad at Kayln's Kitchen and I am hooked.


It is so exceptionally easy. I make a batch on Sunday night and then eat it for lunch until Wednesday/Thursday!

Ingredients:
2 cups cooked chicken, shredded into large pieces
2 medium avocados, diced (I use 3)
1 T lime juice
salt, to taste
1/4 cup thinly sliced green onion
1/2 cup finely chopped fresh cilantro
2 T mayo or light mayo (I just used 1 T since I added more avocado)

Instructions:

  1. Shred the chicken apart until you have 2 cups of chicken shredded into fairly large chunks.   
  2. Dice the avocados into medium-sized pieces, mix with 1 T of the lime juice, and season avocado with salt to taste.  
  3. Thinly slice the green onion and finely chop the cilantro.  
  4. Mix mayo and 1 T lime juice to make the dressing.
  5. Put the chicken into a bowl large enough to hold all the salad ingredients. and add the sliced green onions and dressing and toss until all the chicken is coated with dressing.  
  6. Add the avocado and any lime juice in the bottom of the bowl and gently combine with the chicken. Then add the chopped cilantro and gently mix into the salad, just until it is barely combined.
  7. Enjoy

I enjoy mine with wheat thins, or just straight out of the bowl with a spoon!

Tuesday, January 28, 2014

Loaded Baked Potato Chicken Casserole

I found a great recipe for Loaded Baked Potato Chicken Casserole from "My Sweet Little Steiner Family" and had to try it. After all, with a recipe title like that, what isn't to love?

Since the cutting up of the ingredients and the pre-roasting of the potatoes takes a little while (and since my husband has no patience when he is hungry and thinks every meal should be ready by 5:30pm), I prepared the potatoes the night before so that they were ready the next night for the chicken and other ingredients.

Here's how you can make Loaded Baked Potato Casserole!

Ingredients:

  • 2 lbs chicken breasts, cubed or shredded
  • 10-12 small red potatoes diced (I used 6 medium red potatoes)
  • 1/2 cup olive oil
  • 1 tsp. salt
  • 1 Tbsp. Tabasco sauce ( I added this for a little kick)
  • 1/2 Tbsp. oregano (I added this just because I like a little herb taste in my taters)
  • 1 Tbs. freshly ground pepper
  • 2 Tbsp. salt
  • 1/2 Tbs. garlic powder
  • 2 c. Mexican Blend Cheese
  • 1/2 c. crumbled bacon (I substituted "real" bacon bits)
  • 1/2 c. chopped green onion (I forgot this ingredient, oops)
Directions:
1. Preheat oven to 475 degrees. Wash and cut your potatoes. As I said above, I had medium-sized red potatoes so I only used 6. I also use an apple corer/slicer to cut my potatoes because it is SO much easier than quartering them by hand. I just half the potatoes then use the apple slicer to cut them into pieces. If the slices are too large, I just half them.


2. Mix the olive oil, Tabasco, garlic, pepper and salt. Pour over potatoes and shake to really coat the potatoes in the seasoning.

3. Place the potatoes into a greased baking dish, leave as much of the mix as possible.  Bake potatoes for 1 hr, stirring the potatoes every 15-20 mins. Check with a fork to ensure the potatoes are done.


4. While the potatoes are baking, cut your chicken into hunks and pour in the bowl that that potatoes were seasoned in. Mix the chicken around so it can be covered in the leftover seasoning from earlier. Pour the chicken into a skillet and cook through until chicken is practically done (just a little pink)

5. Combine the cheese and crumbled bacon (or bacon bits like I used) along with the green onion (which I didn't use) in a separate bowl.

6.  Once the potatoes are finished, dump the chicken on top of the potatoes, spreading out as evenly as possible. Cover the chicken & potatoes with the cheese mixture. Turn the oven temperature down to 400 degrees and put the dish into the oven. Cook about 10 to 15 minutes until the cheese is melted and the chicken is cooked through.


7. Serve with sour cream or ranch dressing (or nothing at all) and enjoy!


Thursday, January 9, 2014

Copy Cat Salads

Texas Steakhouse has an amazing salad called the "Harvest Salad" that I always order with grilled chicken on top. It has citrus fruits, poppy seed dressing and pecans so what's not to love? The $13 price tag, that's what.


So I set out to make my own version of it at home. First, I made poppy seed dressing from this Betty Crocker recipe and some sugar-roasted pecans using this recipe.

Then I made my salad:
  • Romaine lettuce
  • Sliced strawberries
  • 1/2 can of mandarin oranges
  • 1/2 can of pineapple chunks
  • 1/2 cup of dried cranberries
  • 1 grilled chicken breast
So yummy, delicious and more nutritious than most lunch meals I would usually eat. 

I loved that salad so much, that I decided to recreate another favorite salad of mine from Wendy's, the "Apple Pecan Chicken Salad". With chunks of blue cheese, green & red apples, pecans and dried cranberries, it is amazing and has similar ingredients to my other fav so I knew I could recreate it easily. 
I used the sugar-roasted pecans I made earlier and a bottle of Hidden Valley's Pomegranate Vinaigrette dressing top off these ingredients:
  • Romaine lettuce
  • 1/2 cup dried cranberries
  • 1/2 a Granny Smith Apple (cut into wedges)
  • 1/2 a Red Delicious Apple (cut into wedges)
  • 1/4 cup blue cheese crumbles
  • 1 grilled chicken breast.
With these recipes for yummy salads, it's been a lot easier to eat lunch in the office, saving time & money!

Friday, January 3, 2014

Crockpot Honey Apple Pork Loin

Our local Food Lion had a HUGE sale on pork loins last week, and not being able to pass up a good bargain I snatched up two... then realized I don't really have any recipes to cook these jokers with.

So, I hit up Pinterest and found this delicious recipe at "Born to Pharm" for a "Honey Apple Pork Loin" then just made some of my own little changes. It's even gluten free. Enjoy!

Ingredients:

  • 2 to 3 lb. boneless pork loin roast
  • 1/4 tsp. nutmeg
  • 2 or 3 apples, cored and sliced (peel left on)
  • 4 T. honey (approx)


Directions:

1. Core and slice your apples and place them in the bottom of the crockpot and sprinkle with nutmeg.


2. Slice the pork loin into 1/2 to 3/4 inch sections, not cutting all the way through, just cutting little slits. Pour a little honey inside each slit (I just kind of winged it, put as much as you want).

3. Place one of the apple wedges (the ones not in the crockpot already) inside each slit.

4. Place the pork loin in the crockpot on top of the apples and sprinkle with more nutmeg and honey (if you want).

5. Cook on low for 6 to 8 hours and then shred with a fork (it will be that tender).

I added some more honey & nutmeg when I got home, just to boost the flavor and it was amazing.

Tuesday, December 17, 2013

Venison "Cube Steak" Rollups

thanks to Jordan, my brother-in-law, Josh and I have a freezer full of deer meat in all shapes and forms. So, I am always looking for new ways to cook it and was happy to stumble upon a "Stuffed Cube Steak Rollup" recipe on a blog called "Another Waters" and modified it more for our taste!

You'll have to forgive my lack of pictures, I decided about mid way through the recipe "hey, I should blog this."

Ingredients:
4-5 pieces cube steaks (or cubed venison meat)
marinade (recipe below)
2 oz cream cheese, softened
4-5 pieces uncooked bacon
1 Tbsp. dried parsley

Marinade:
   1/4 cup Worcestershire sauce
   6 tablespoons soy sauce
   1/4 cup minced garlic
   1/2 medium onion, chopped
   1 tablespoon dried Rosemary
   1 tablespoon pepper
   3 tablespoons steak seasoning of your choice
   3 tablespoons of your steak sauce of choice (I used A1)

Directions:
1. Combine the ingredients for your marinade and blend well in a food processor (or just by hand) and pour over your meat. Marinate for 4 to 24 hours, I like to marinate mine for the whole 24, it has more flavor!

2. Pre-heat oven to 375 (although this will be grilled you will need the oven later). Once your meat has marinated, mix your softened cream cheese with the parsley and smear on one side of each piece of meat.

3. Roll your venison or cubed steak into a roll with the cream cheese on the inside and wrap with bacon.

4. Here comes the tricky part. Because the meat is all rolled up, it makes it hard to cook all the way through. I turned my George Forman grill to high and seared the meat brown on the outsides for about 10 minutes on each side, flipping every 5 minutes then I put it in the oven at 375 until the insides are no longer pink, usually around 20 minutes or so. 

I do not have a picture of the finished product because we ate so quickly, trust me it is delicious!


Monday, October 21, 2013

weekend update: a recipe & a rainy tailgate

I am linking up with Sami @ Sami's Shenanigans for Weekend Update!

Sami's Shenanigans

We had our first Pirate home game in three weeks on Saturday and sadly it started at 12 noon so that meant we only had a little over 3 hours to tailgate (since Josh likes to get inside the stadium at least 45 min before the game starts).

However, the earlier game also meant I got to make one of my favorite (and easiest) breakfast recipes, the Cheesy Sausage Crescent Casserole. Of which I have a horrible picture since I snapped it at 6:30am and also because I didn't get a "completed" picture because we ate it all before I could.

All you need is:
shredded cheddar
1 lb. of sausage
Ground Sage
Ground Mustard
2 packets of crescent rolls

Directions:
1. Preheat your oven to 375

2. Brown your sausage, sprinkling in some sage & mustard as you cook it

3. Roll out one of your crescent roll packages, DO NOT separate the crescents, leave it as one big sheet and kind of "smoosh" the edges where the triangles are grown so that it stays one big sheet

4. Cover the crescent roll with a layer of cheese & the sausage

5. Add another layer of cheese and place the second crescent roll sheet on top (repeating the "smooshing" of the triangle edges)

6. Press together the edges of the two crescent roll sheets to keep the cheese and sausage inside

7. Bake in the oven until the top crescent roll starts to brown (about 18 minutes)

Here are some pictures from the tailgate (that you already saw if you follow me on instagram)


terribly blurry, but it's so hard to get a "normal" picture of Josh 

We played about 45 games of flip cup then had to pack ourselves under the tailgate tent when the rain started up.


We slaughtered the University of Southern Mississippi 55 to 14 (mind you, those 14 points were scored on our 4th string defense) so the game itself wasn't as exciting as a nail-biter game (but much more relaxed).

How was your weekend?

Wednesday, July 31, 2013

Baked Zucchini Sticks

During summer in the south (and most other places too, I'm sure), zucchini and squash are staple vegetables in our house. Not just because we love them, but because we usually get a never-ending supply of them from our grandparents.

So, I am always trying to find new ways to cook them besides the standard stir-fry (and country fry)method that I love.

I found this great recipe for baked zucchini sticks at King Arthur Flour and new I had to try it. While the dip recipe that went along with it looked amazing, I don't have a food processor or the patience to caramelize onions.
via

Ingredients:

  • 3 medium zucchini, unpeeled, cut into 3"-long stick
  • 1 tablespoon salt
  • 1 cup coarse, dry bread crumbs (e.g., panko)
  • 1/2 cup freshly grated Parmesan cheese
  • 1 tablespoon italian seasoning
  • olive oil spray
  • 2 large eggs


Directions:
1. Cut zucchini in half then quarter the halves and preheat the oven to 425°F
2. Place the zucchini sticks in a colander over a bowl and sprinkle with the tablespoon of salt. Let the zucchini drain for 1 hour or longer (they give off a lot of liquid and this helps get rid of it) rinse and pat dry.


3. Combine the Panko, Parmesan, and Italian seasoning in one dish and whip the egg in another.

4. Dunk the sticks a few at a time in the egg, then place on a sheet of wax paper and sprinkle the pankomix on top of them. The original directions said to "roll in the panko crumb mixture", but the crumbs get so clumpy from the egg that they don't stick as well. 

5. Place the sticks on the baking sheet that has been sprayed with olive oil spray (or Pam).


6. Bake sticks for 12 minutes, turn over, and bake for an additional 8 minutes, until golden brown and crisp.


7. Enjoy! (as you can see, I enjoyed mine with a fat steak, onions and roasted potatoes).

Do you have a great zucchini recipe?

Monday, April 8, 2013

Gluten Free Coconut Shrimp and Cilantro-Lime Dipping Sauce

I die for anything coconut, so when I found a great recipe from Skinny Taste for Skinny Coconut Shrimp, I knew I had to make it. I just edited it to be gluten-free AND fried (I am from Eastern NC y'all) and then used this recipe from Epicurious for a Cilantro-Lime Dip.

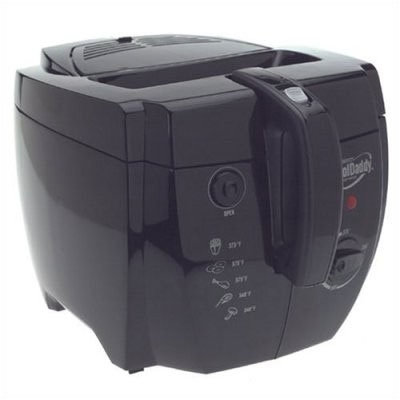
Also, I use my "Cool Daddy" deep fryer for EVERYTHING I fry, it is so easy, clean and much safer when you're as accident prone as I am (nobody likes crazy hot grease popping into their eye, ouch).


Coconut Shrimp Ingredients:
  1 lb. peeled, raw shrimp (the bigger, the better)
  1/2 cup shredded sweetened coconut
  1/2 cup crushed Gluten-Free crackers (I use Crunch Master "Sea Salt")
  2 tbsp Bob's Red Mill Gluten Free flour (or just whatever rice flour you like)
  1 large egg
  pinch salt
  oil (for frying)


1. Set up your dredging station. I love shallow bowls for dipping and dredging and honestly the best kind are Cool Whip  containers, no joke.

2. Dip you shrimp into the flour then shake off excess, then dip into the egg, followed by the coconut and crushed cracker mix.

3. Once you have battered all your shrimp, pop them bad boys in the fryer and cook about 12 to 13 minutes (until outsides are brown and shrimp are pink). 
yes I know how gross the fryer looks, it shows how much I use it though!
4. Take them out and allow to cool on paper towel-covered plate (absorbs extra grease). Then serve with Lime-Cilantro dipping sauce (see recipe below). 


Lime-Cilantro Dip Ingredients:
  1/2 cup mayonnaise
  1/4 cup sour cream
  2 tablespoons finely chopped cilantro
  2 teaspoons grated lime
  1 tablespoon fresh lime juice

Mix ingredients and serve with shrimp!


Thursday, March 28, 2013

SPD: Southwestern Black Bean (and Venison) Salad

I'm linking up with Katie @ Keep Calm & Carry On and Stephanie @ Beautiful Mess for "Saw it, Pinned it, Did it!"


This week's recipe, "Southwestern Black Bean Salad" is actually originally from one of the gorgeous hostesses, Mrs. Katie!

..however my husband is a MAJOR carnivore so I adjusted the recipe a little to add some meat using some ground deer meet (thanks to Josh's little brother's successful hunting season) and made it a little bigger so we could eat on it for lunch this week.


Katie' version
and mine
Let me go ahead and apologize in advance for how bad the pictures are, my camera battery charger is MIA, so I had to use my cell, forgive me!
1 (15.5 oz) can black beans rinsed and drained

1 (16 oz) bag of frozen corn, thawed
2 tomatoes, chopped (or 2 cans of Rotelle)
1 medium avocado, diced
1/2 cup red onion, chopped
2 limes, juice of
1/2 cup Olive Oil 
2 Tbs cilantro
salt and fresh pepper
1 envelope of Taco Seasoning mix 
1 cup Mexican Blend shredded cheese
*Venison (or just ground hamburger)


1. Combine beans, corn, tomato, onion, cilantro, salt and pepper. Mix with jime juice and EVOO. Marinate in the refrigerator for 30 mins.


2. Brown your venison (or hamburger) then drain and season with the taco seasoning (just follow directions on packet). 


3. Add the meat, cheese and avocado to your "salad". 

Note: Because I make such a big batch, I add the avocado to my individual serving each time, since re-heated avocado isn't so good. 


4. Serve with Tostitos and some sour cream!